I Finished It Friday: Ballard Designs Inspired Beadboard Drying Rack Tutorial
I am in the process of redesigning my laundry room.
I have been looking at tons of pictures for inspiration and
I noticed a drying rack by Ballard Designs that kept popping up.
I just knew it would be a perfect addition to my new laundry room.

Although I loved (really loved) the large size,
I measured the space in my laundry room and it just wouldn’t fit.
The medium size seemed to be the better match.
But at $139 (on sale) plus tax and shipping…
that didn’t match the amount of cash I had in my wallet. 🙂
I had seen some DIY knock-offs of this idea
but none were exactly like the original.
So, this lady decided to build her own.
No plans to follow.
Just a picture combined with some wood, glue, a nail gun,
and some lots of determination.
I think this lady did pretty good…

I would like to give you some plans to follow,
that way you can build your own, too!
- One roll of bead board wall paper
- One 2×4 pre-cut birch wood (1/2 inch thick)–I had the nice guys at Lowes cut 7 inches off the length, so my final board size was 24×41.
- Two 1/2×2′ poplar boards-for inner frame with dowels (I bought pre-primed)
- Two 1/2×4′ poplar boards-for outer frame (I bought pre-primed)
- Two 2×2 birchwood boards (1/4 inch thick)
- Four 3/8″ dowel rods (48″ long)
- Narrow pin hinge (set of two)
- D-ring hangers for mounting on the wall
- Hinged bracket for the side
- Two Round Magnets
- Steel Wood Joiners
- Wood Glue
- Liquid Nails
- Spray Paint
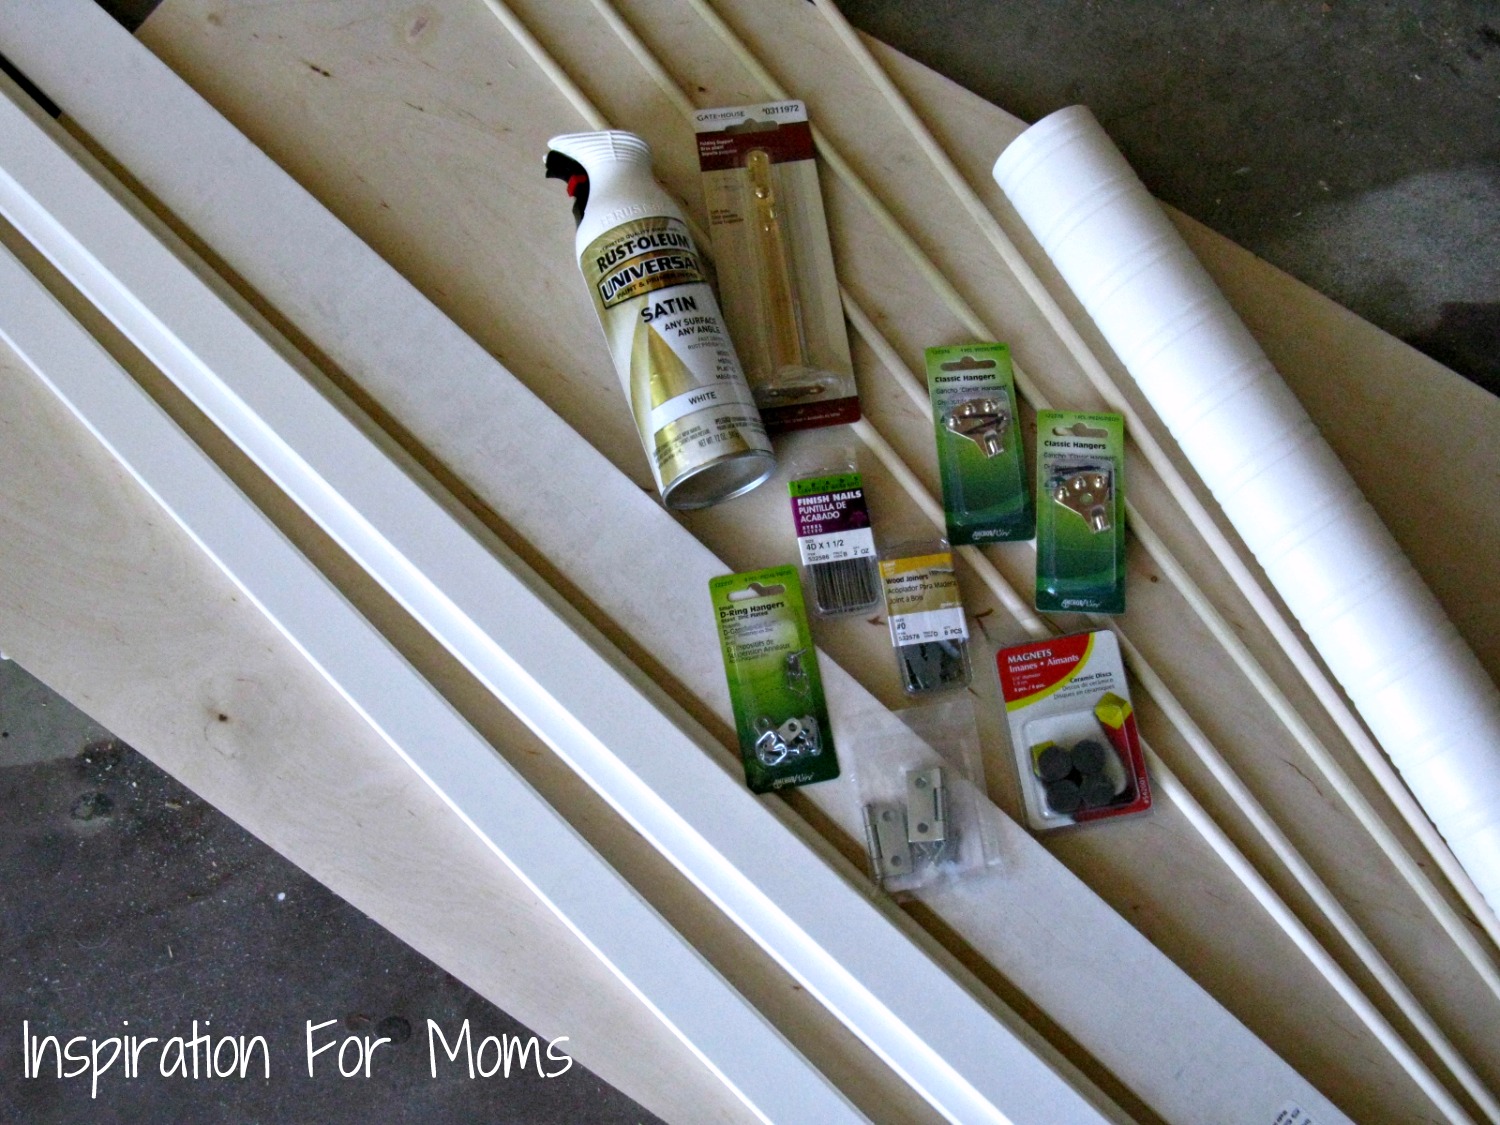
There are also a few tools you will need to complete this project:
a drill, a 3/8 drill bit, hammer, framing nails, screwdriver, saw
(optional- nail gun)
First Step:
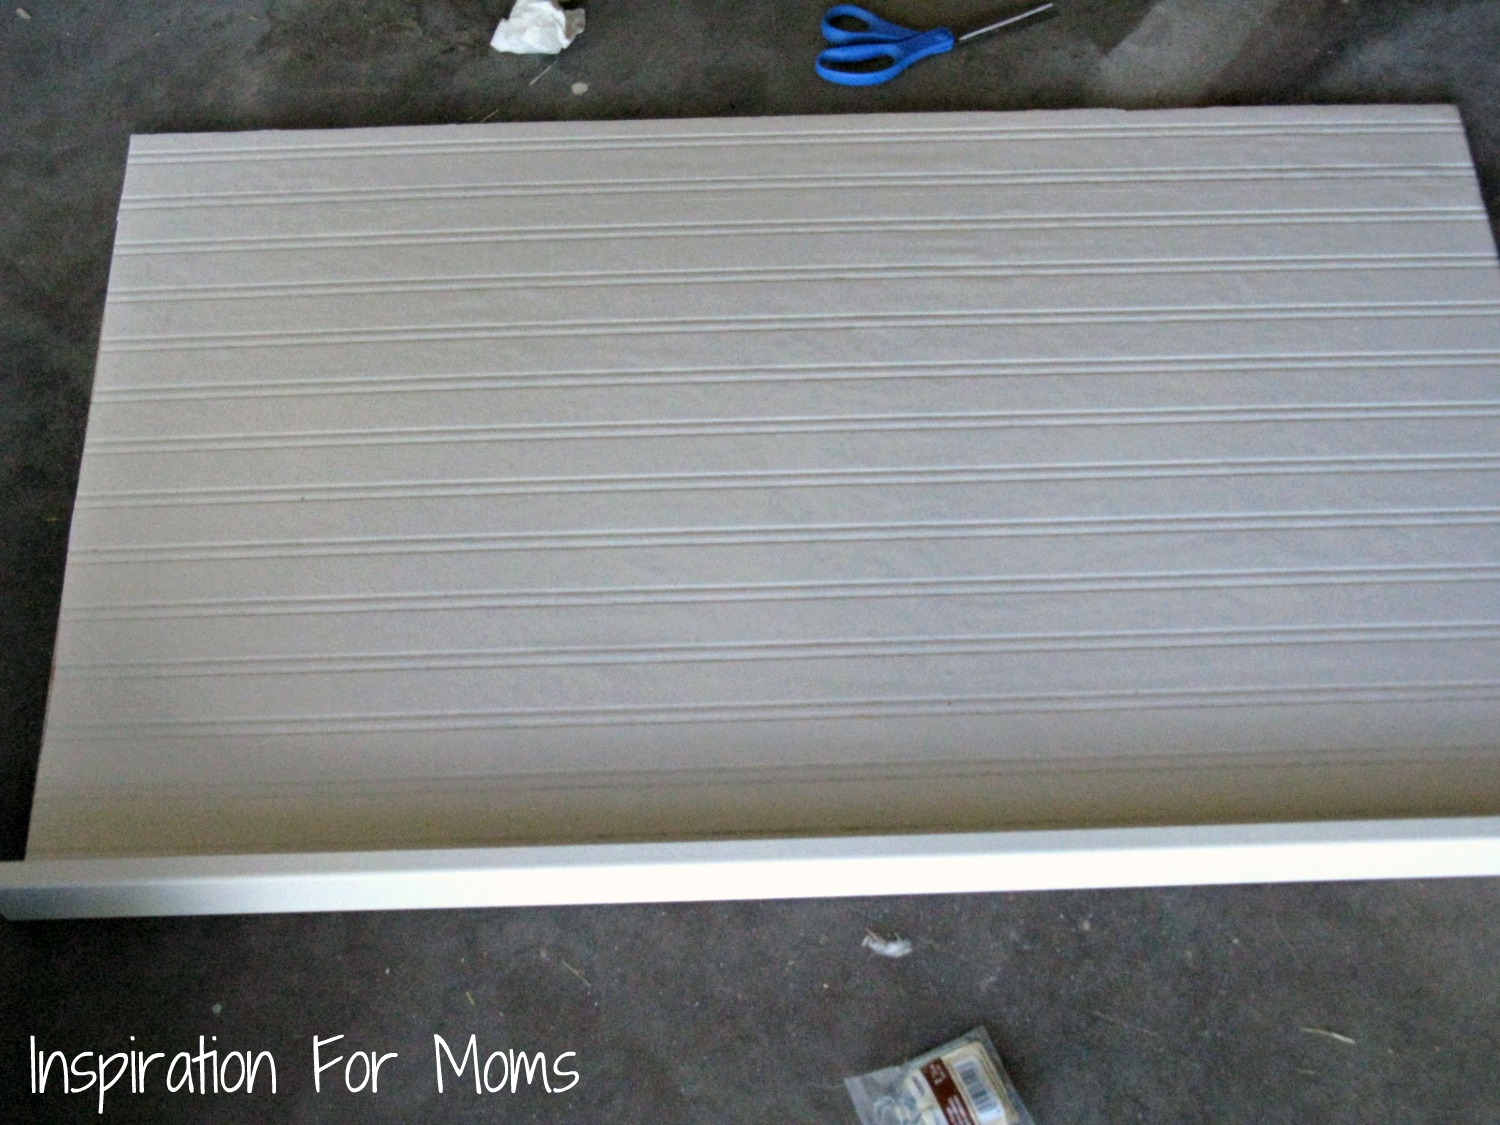
Cover the front side of your pre-cut birch wood with bead board wall paper. (Follow the directions inside the package).
Second Step:
While that is drying, measure and cut your boards for the outer frame. I cut mine at 40¾x26.
Third Step:
Once wall paper is dry, attach your outer frame to the birch wood. I placed wood glue on first then I used my nail gun. You can also use finishing nails.
Fourth Step:
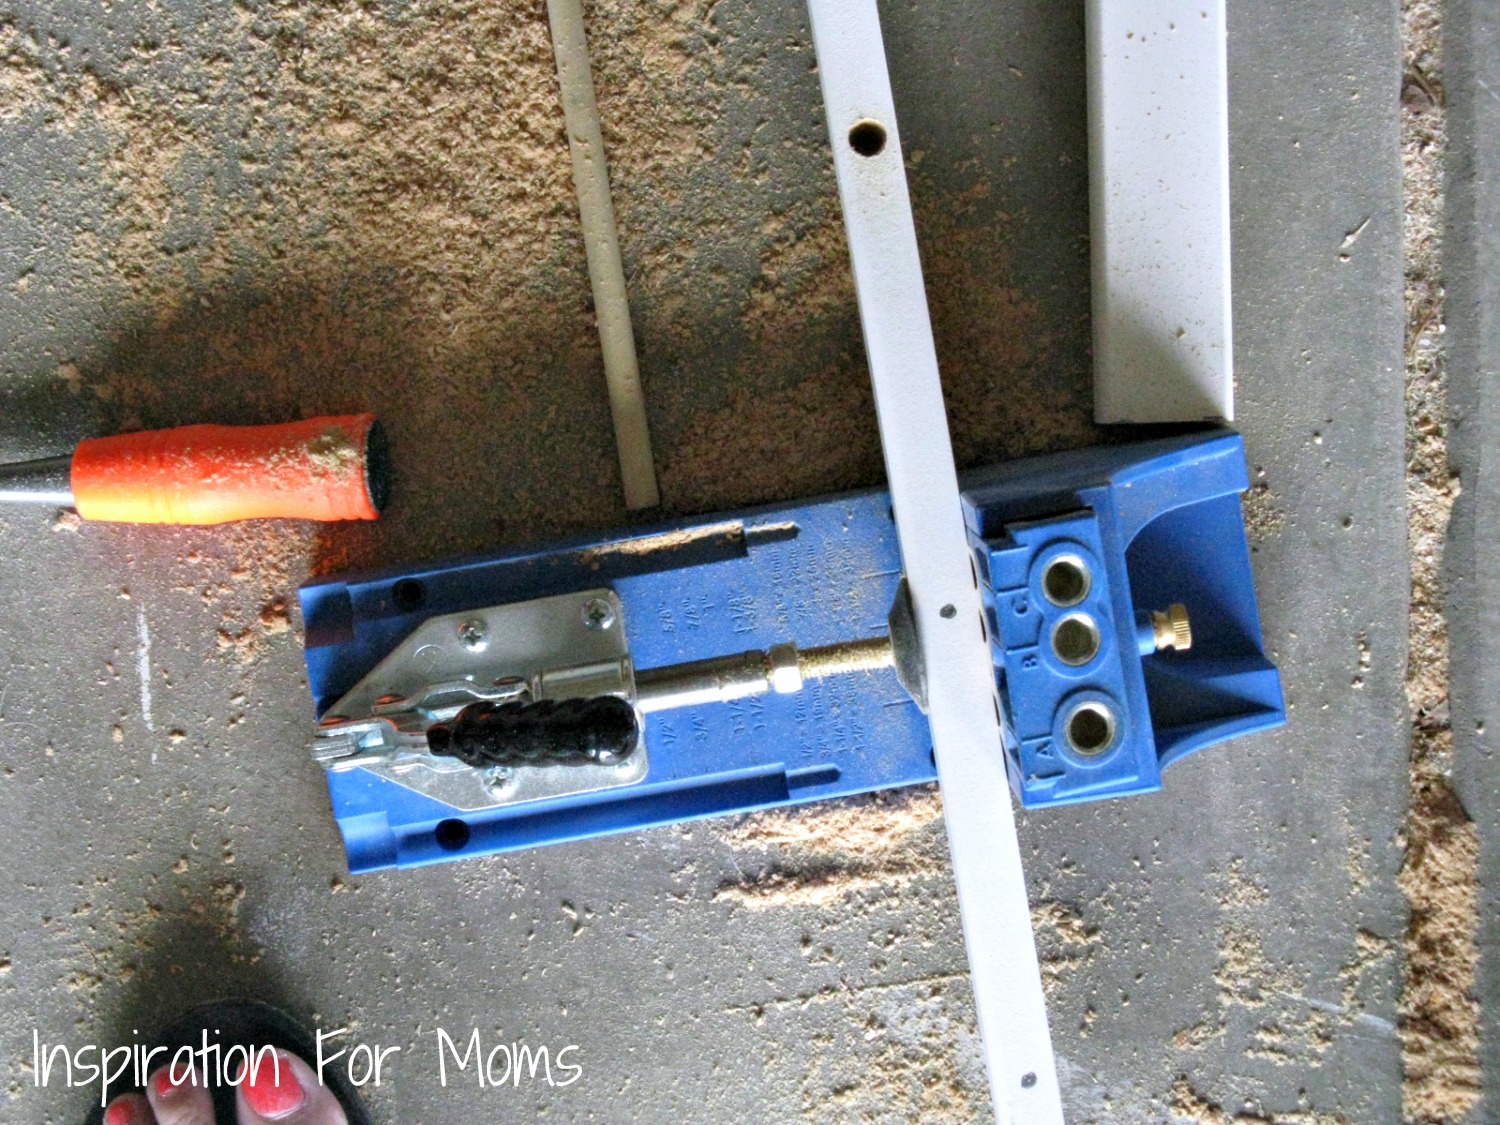
Measure and cut your inner frame. I cut mine at 37×24¾.Then cut your dowels, I cut my at 22½. Next drill holes for your dowel using a 3/8 bit. I spaced mine 5 inches apart except for the last one-which is 4 inches from the bottom. (To me, the last one didn’t look like it was spaced as evenly as the others. Like I mentioned before…I was really trying to make an exact replica!) Tip: I used my Kreg Jig to help hold the board secure while I drilled.
Fifth Step:
Insert your dowels into the holes and hammer into place with a mallet. I also placed a tiny drop off wood glue inside each hole just for extra strength. Then finish the frame by attaching the remaining top and bottom pieces with finishing nails. The nails will need to be 3 inches long. Tip: I pre-drilled holes through the top/bottom board to guide the nails. Less you risk splitting the boards.
Six Step:
Attach your two 1/4 inch birchwood boards to the inside of the frame, both at top and bottom. To secure it, I used some liquid nails and my nail gun. If you have any boo boos, this will hide them nicely.
Here you see the nail gun gone bad…

Here you see the nail gun gone bad…

And here you don’t (it’s our little secret!)

Seventh Step:
Time to spray paint. I used RustOleum White with a satin finish.
Eighth Step:
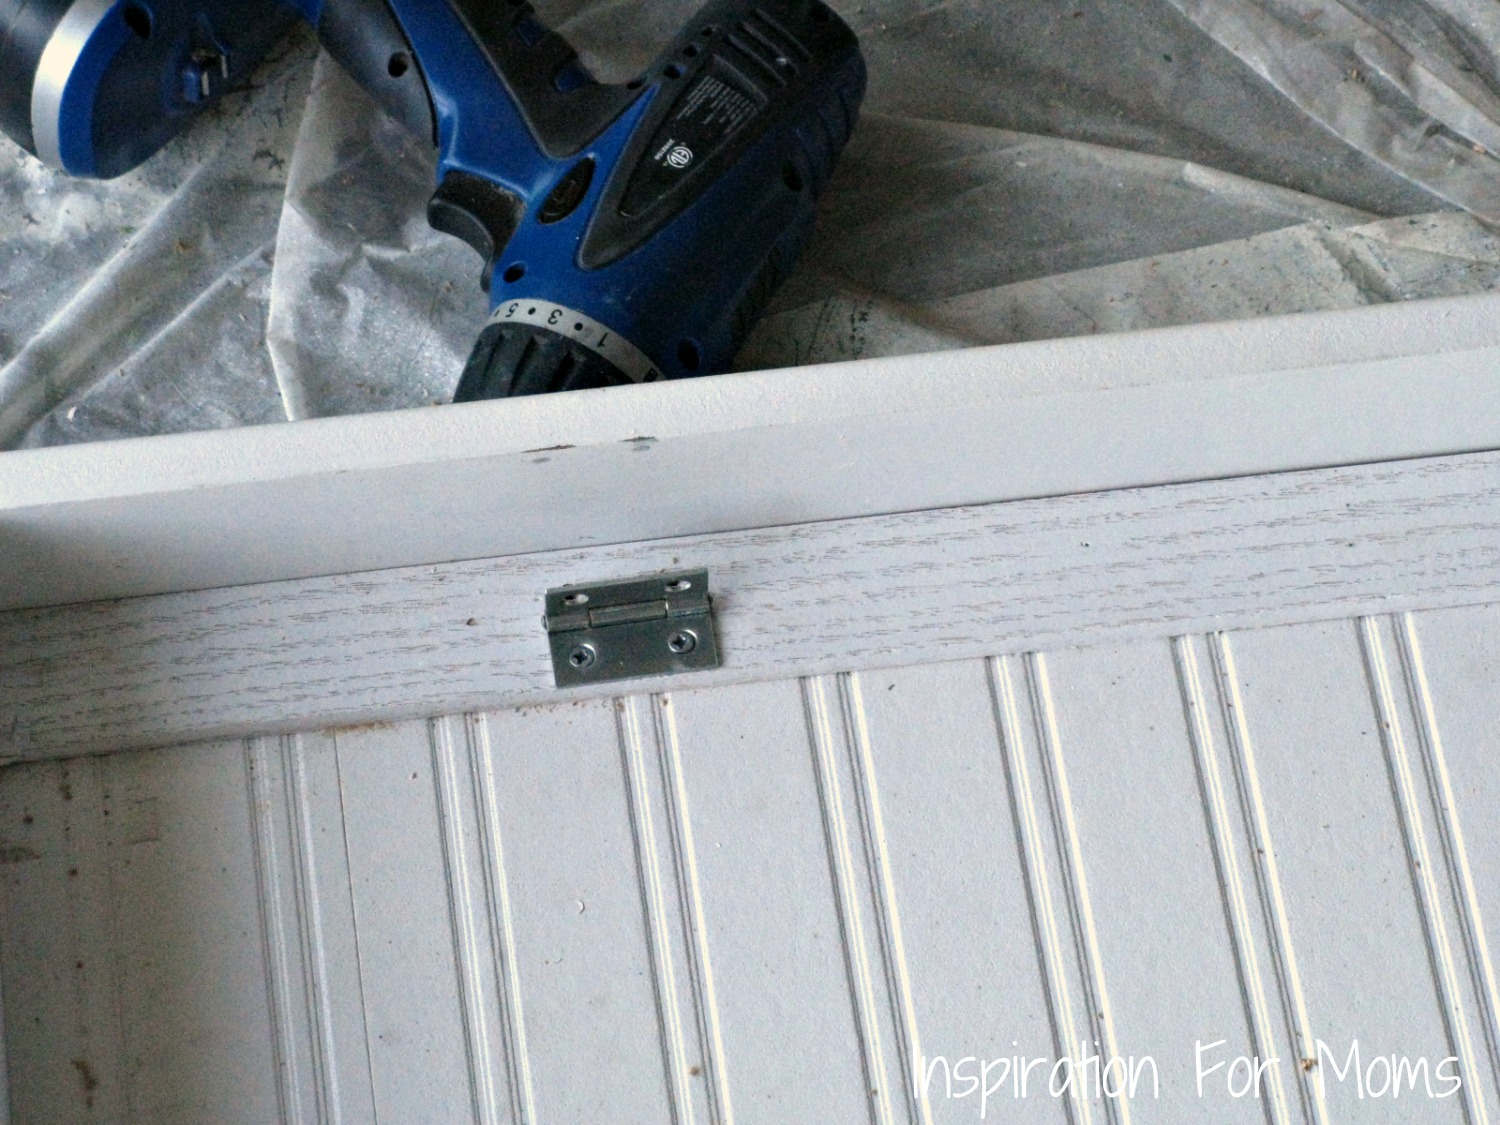
Attach your pin hinge with your screwdriver. Then attach your hinged bracket for the side.

Ninth Step:
To attach your magnets to the frame I first measured and placed these steel wood joiners…

They have very sharp spikes attached to them. I simply hammered them into the underside of the frame. Then I stuck the magnet to the metal. When the magnets were attached, I placed super glue on their backs. I then just closed the frame and pressed down. That’s how I achieved perfectly lined up metal to magnet. ( I did notice that my magnets were not as even as I would have liked but I couldn’t move them. It isn’t called Super glue for nothin’. I wish I wasn’t such a perfectionist!)
Tenth Step:
Attach your d-rings on the upper back. Then attach your hangers to the wall. I used my measuring stick trick to hang it perfect the first time.
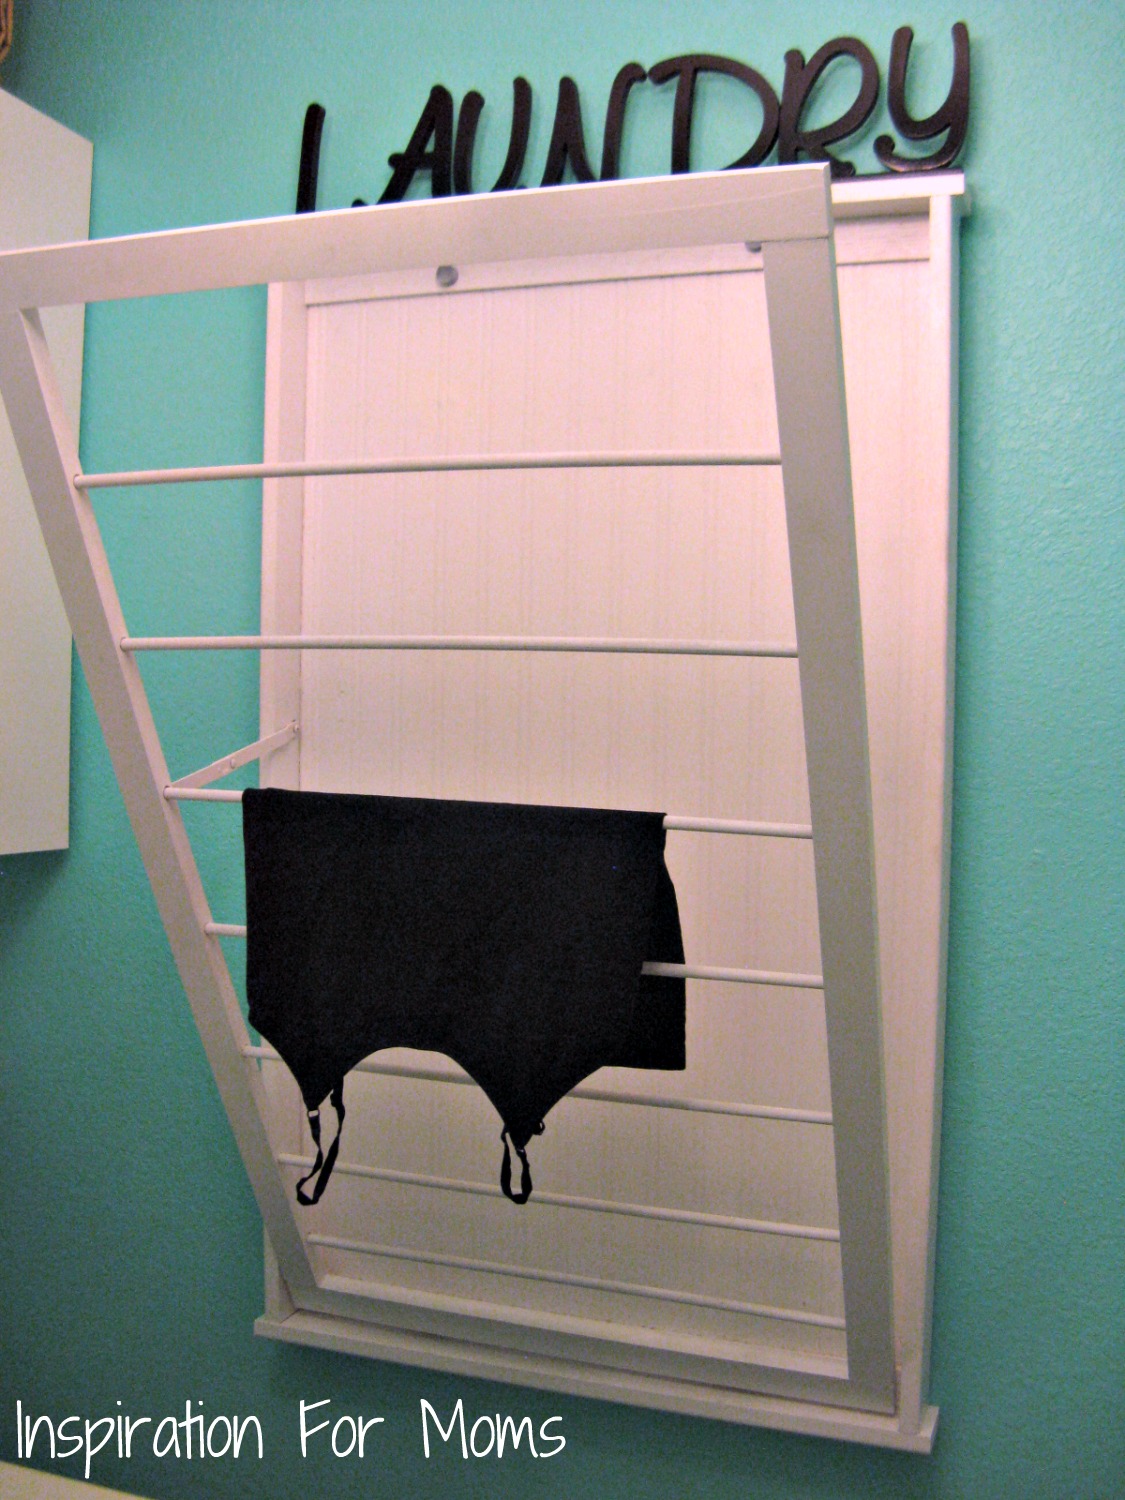
Now it’s ready to hang on your laundry room wall.
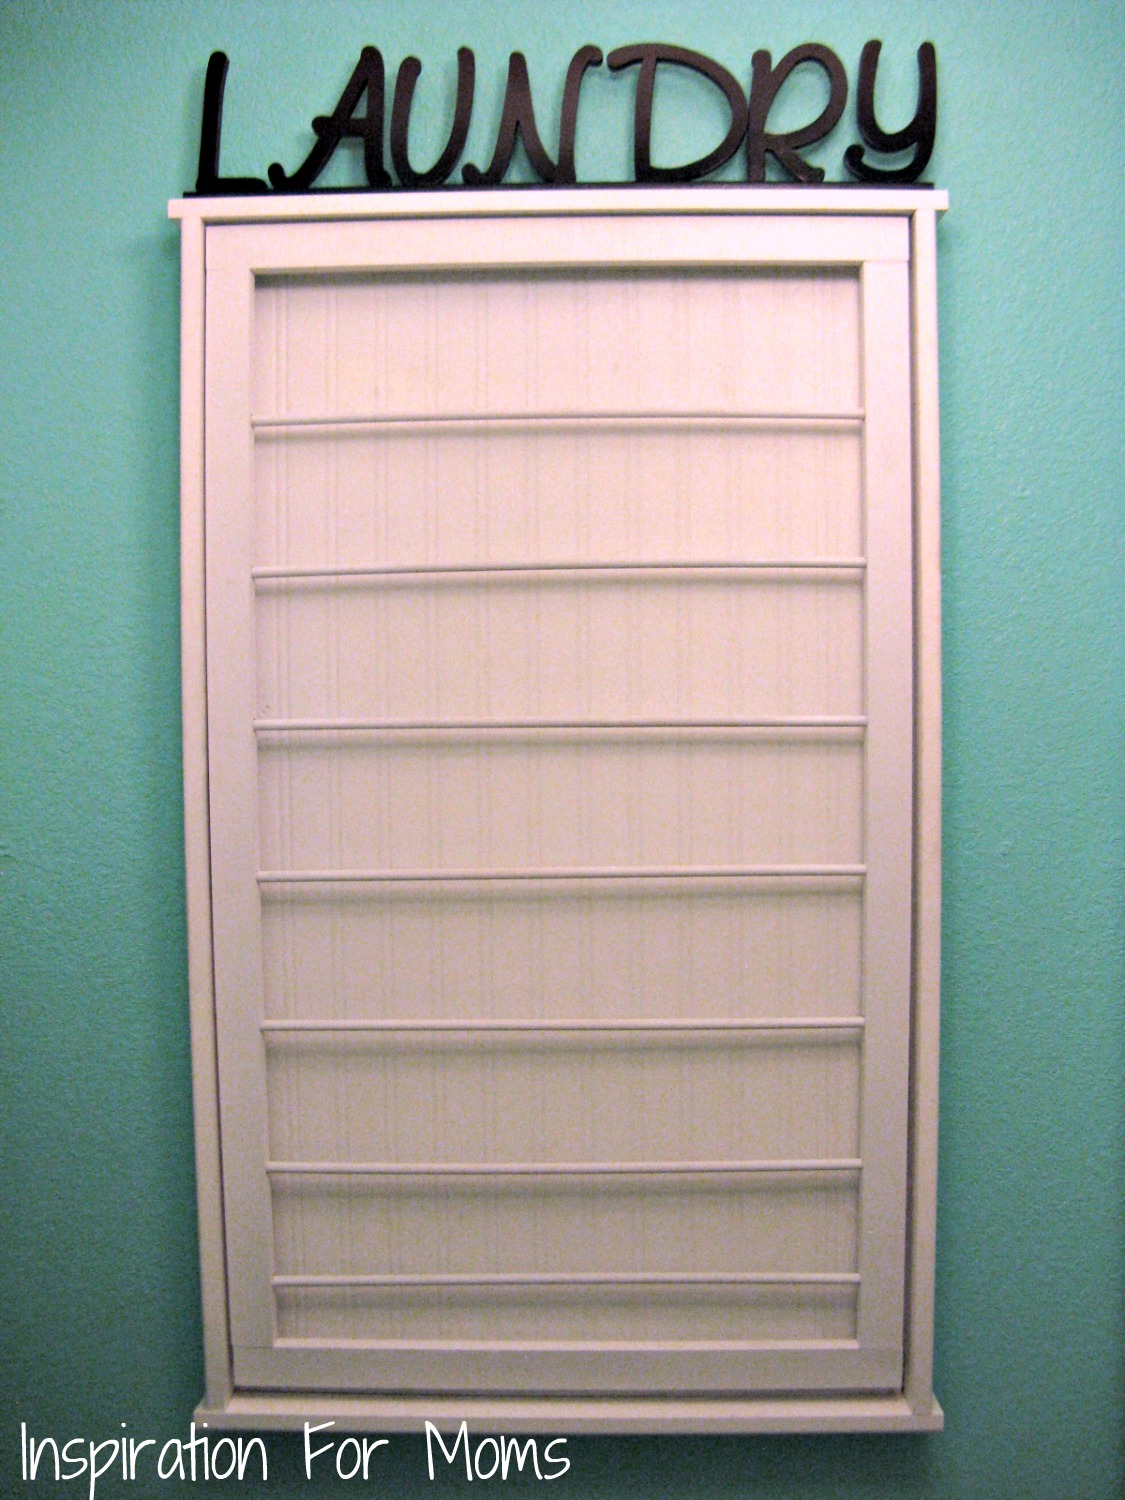
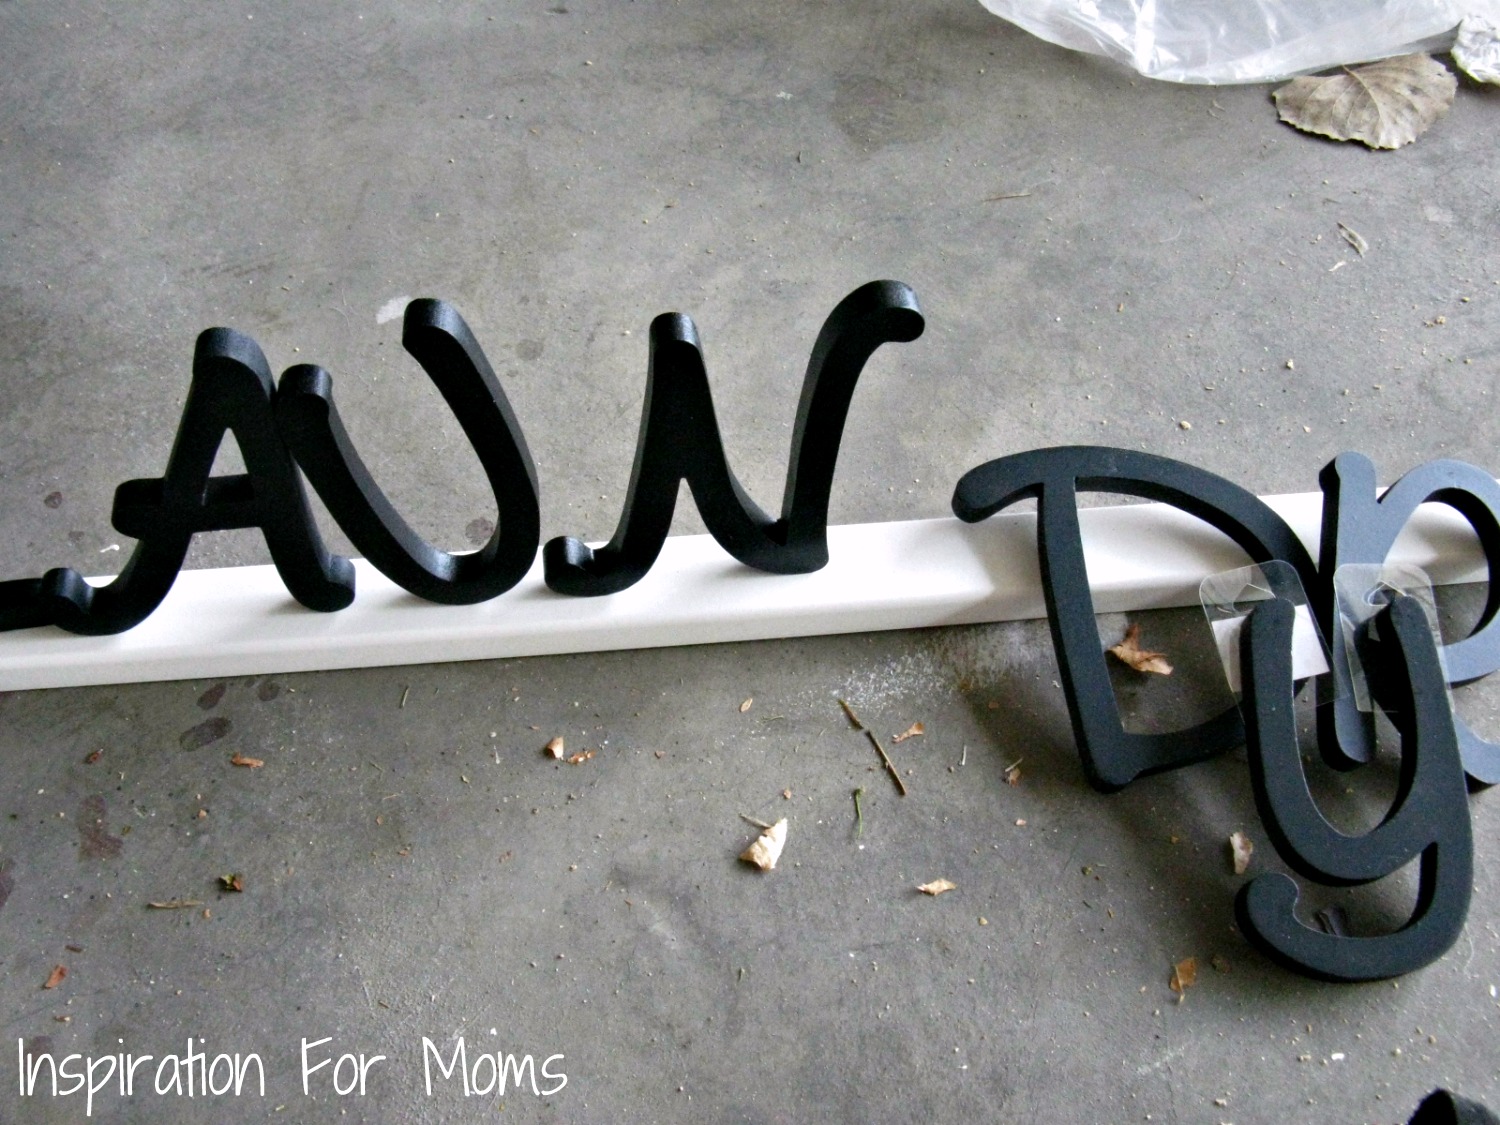
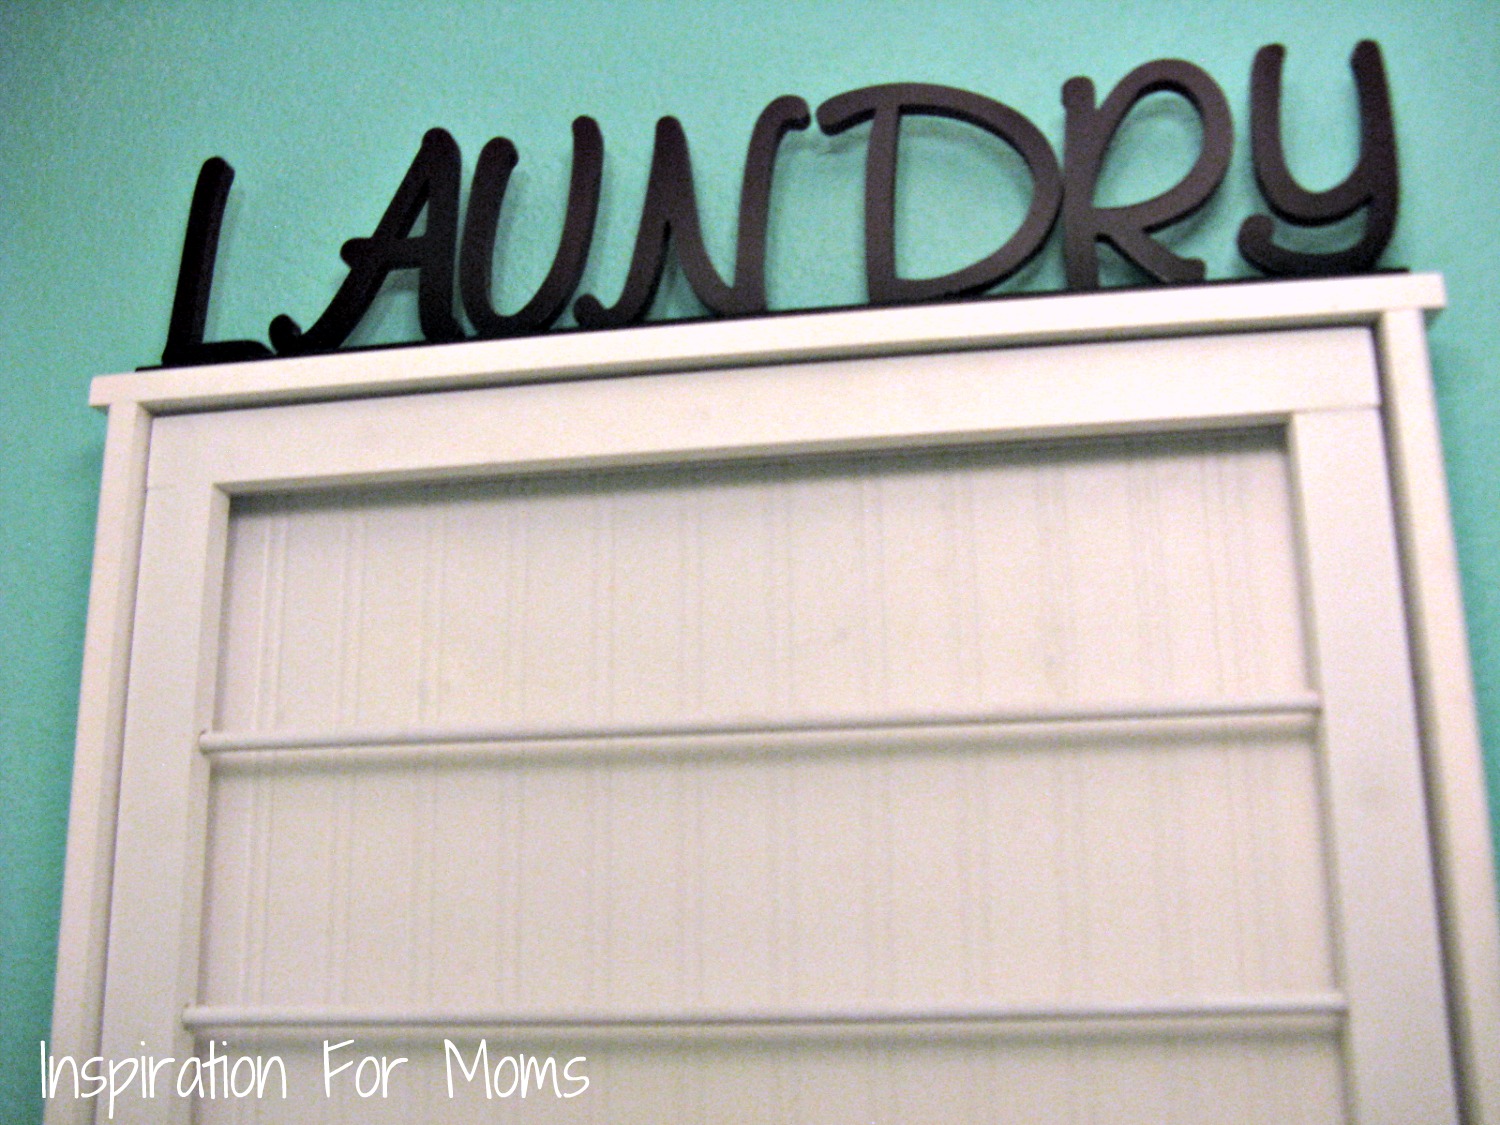
And yes, I even made my own Laundry Sign.
You could buy one from Ballard Designs for $45 (plus tax and shipping)
or you could make one.
I grabbed my letters at Micheal’s. I already had the board, liquid nails and spray paint.
I am accessorizing my laundry room with black and
I love how the sign adds some nice contrast.
Now I have a nice place to having my delicate clothing…
you know what I mean ladies, your lingerie.
you know what I mean ladies, your lingerie.
The total cost for my drying rack was around $55.
And it took me a few afternoons to build.
Now, I just need to finish the rest of my laundry room,
then I can share pictures of the whole space! 🙂
Linking To:
*this post contains affiliate links
Thats awesome! Great job!
Great idea~so crafty! I love the laundry letters!
Now following!
I really like these. They look like decor but are so practical.
This turned out so great! Visiting from TT&J, have a great weekend! Thanks for the step by step instructions!
I could really use one of these!
Wow it looks great and I love the added letters on top. xx
Without a doubt this is one of the best things I’ve seen in Blog Land, and I have seen a lot of great things. I really love this, especially for someone with a small space.
Love this idea! thanks for sharing. came over from Met Monday.
This is such a great project! It turned out so well. I bet you will get a TON of use out of it too. Would you consider linking it up to my Pinworthy Projects Party? I’d love to have you join the party.
I love it! I too had seen this and wanted one but didn’t love the price. Thanks so much for sharing, this is going into my projects to do file. Visiting from Between Naps on the Porch.
Oh This is so awesome! I want it! I have a rope that hangs across my laundry room for drying delicate things!!!! I am featuring this at somedaycrafts.blogspot.com tomorrow.
I am soooo doing this! I have a small bungalow and need to make good use of every space!
This is a great tutorial. Thanks for sharing. I have a big laundry room, but would love to build something like this. So much more low profile than a cumbersome drying rack sitting in the middle of the floor. I love it!
Thanks for the tutorial! I’ve wanted to do this for a while!
http://www.always-a-project.com
Thank you so much! We have a metal fold one that totally gets in the way. So excited to start this project!
Thank you for the plans! I’ve been eyeing three one in the Ballard catalog for over a year, but couldn’t justify paying that much. Yours turned out great!
awesome. DO you have a breakdown of costs?
OMG I love this! Thank you so much, I can’t wait to make this for my home!
Wow this is great. I have thought of getting one myself, but the price is a bit steep for something I am not sure will be put to use. I may have to try my hand at this! Thanks for sharing.
My wife and I were actually talking about this the other day, and I was thinking about building it for her instead of paying for the Ballard one. Your tutorial sealed the deal, thanks for taking the time to upload the pics and itemize the supply list.
Your drying rack looks really good, love your inspiration too – sigh! I’ve got this linked to my drying racks post too today, nice job!
Awesome! Thanks for the detailed plans 🙂 JUST what I needed
Looks good – but oh so little 😀 I’d need a dozen of those racks 😉 I’m really hoping, anyhow, that my better, no, more clever half would make me one of these!!
Brilliant!! A definite must do for my laundry room makeover when the day finally arrives.
I love this!! It looks great and is practical too. I have a big fold out one, that is always in the way – this is the perfect replacement 🙂
Hi! Awesome tutorial. My friend and I just went to Lowe’s this morning to buy everything, but we couldn’t find the hinged bracket for the side, and no one seemed to have any idea of what we were talking about. Can you tell me where you bought it? Do you remember what the name was on the package? Thanks in advance for your help! 🙂
Tyler = Niki, I purchased my hinged bracket at Lowes. I found it on the same isle as the cabinet hardware (knobs, handles, hooks). You may also suggest to the sales people that you need a chain with screw eyes. The hinged bracket may be right next to this item. Good luck with the project! 🙂
Oh how I wish I had space in my laundry room for this! I need one so badly. You did an awesome job, and with no instructions even, thats amazing!
I’m in the process of jazzing up my little laundry space too. I’d love if you came over and checked out the projects that I’ve done so far. Again, nice work, hope you have a great day!
Stacia
http://feathersandsunshine.blogspot.com/2012/08/another-laundry-room-project.html
I absolutely love this! It’s gorgeous and practical.
I like the look of both the white and pink. The black was a nice contrast. If I do this, I will keep the white look. Your directions are easy to understand. Thanks. Enjoy your SITS Day.
Beautiful. What a great addition. Well done.
I love that you made that yourself and for so much less! Houses should have come with drying racks like this….Happy SITS Day!
What a great project! Visiting from SITS.
I absolutely love this! I have never built anything like this before – I am just wondering how much practice/experience you had building things? I am sure I could get my husband to help with the sawing/drilling, but I wouldn’t mind trying to do something like this on my own!
Thanks for the step by step instructions!
I really like this! Will it hold a sweater?
Thanks 2busy! To answer your question, yes it will hold a sweater and even jeans! 🙂
One day when I own my own home and have a laundry room that I don’t have to share with other people I am going to have the best laundry room ever thanks to people like you, lol. I’m actually thinking where could I put something like this now though. I don’t think I could put it on the cement walls in the basement where my laundry is and I have enough trouble with my neighbors not able to keep their hands off my stuff down there. I have my wooden drying rack in my room, but it’s always in the way. Maybe on the back of my door it would work. Hmmmm. Happy SITS day ;).
I love this, I remember seeing it a while back but am so glad you linked it on SITS so I could refresh my memory, pinning it for my to-do list!! Love your blog design too!
Now I just need a laundry room instead of my gross basement!! Great tutorial!!
Wow, that is beautiful and practical. Love it. Glad to have found you, visiting from SITS!
You love Ballard Designs too? What a great knock-off you’ve made. Bravo! And the money you’ve saved… oh, and while I’m at it — let me also say, BRAVO! again for being “featured” on SITS!
Happy holidays!
Functional AND gorgeous! Happy SITS day (late)!
wow! you’re a serious DIY-er! i wish i had the time. i love admiring these kinds of wonderful projects.
Could you just make this for me? lol I love it!
Thank you for the instructions. I am in the process of trying to build this myself. When you mention 1/2 x 2 and 1/2 x 4 poplar, do you mean 1/2 x 2″ x 4′ and 1/2 x 4″ x 4′. Thanks
Happy to hear you are building yourself a drying rack! Yes, your measurements are correct. 🙂
Good luck and happy building!
I was wondering how your total cost was 55.00. I just came from my local lowes and got all the items to build this and my total cost came out to 80.00.
Prices may very a little and I already owned the beadboard wallpaper and spray paint from previous projects. Still…$80 is a lot cheaper than buying retail. 🙂 Good luck on building your drying rack.
Do you know the color of your laundry room?
Kristina, the color is called Simply Aqua. 🙂
this was a great project I made one for my daughter for christmas she loved it. easy instructions not hard to do at all. thank you soo
much
I have been looking all over for a tutorial of this… thank you sooooo much!!!!
I am about to pull my hair out! My drying rack looks fabulous but I am stuck on putting on the bottom hinges. ANy advice?? PLEAAAAAASE help me!
So sorry you are frustrated. 🙁 The hinges can be a little tricky as I remember. I placed my hinges inside the drying rack and screwed them in first(securing them) then I attached the other side of the hinge to the moveable rack. I remember having to move mine because I originally placed them too high.
Hope this helps you. If not, leave me another comment or you can email me at inspirationformoms@gmail.com. 🙂
I made some minor adjustments and made it work!I am curious however of how much of a gap you left on the bottom ( where the inner frame with dowels sits in the larger outer frame).
Thought I’d share what saved me some money (of course the hardware store didn’t have the wood joiners) so i ended up buying single metal washers (x2) and used those instead (32 cents!).
OF all the drying racks I have seen, this is by FAR the absolute best! THANK YOU for giving us a tutorial!! kiss kiss kiss!
Ya!!! So happy you made it work. 🙂 I just went and measured mine and I have about a 3/4″ gap.
Metal washers is a genius idea! Thanks for sharing and congrats on a job well done! Enjoy your new laundry rack lady! Hugs!!
Thank you for this! I, too, have been eying up the beadboard drying rack from Ballard designs, and am turned off by the price. I will have to try this out!
I’m puzzled by the inner frame dimensions. The plywood base is 24″ X 41″ but you say the inner frame is 24 3/4″ X 37″. This would make it 3/4″ too wide and 4″ short. That sounds wrong to me. Can you explain?
John, the plywood base is 41 x 24 but once you add on the outer frame the dimensions will be 43 x 26 (step 2). So then you will have plenty of room for the inner frame at 37 x 24 3/4. Hope that helps! 🙂
So happy that I have my supplies and ready to go!
I am a little puzzled like John above. I did read your response and review Step 2, but still confused.
The inner board does not grow as birch wood strips are placed across top and bottom (hiding the nail gun that went wrong). The outside frame (1/2″ ) is placed on “pegboard” which in turn creates a smaller “inside”.
We will out, just thought maybe I was missing something! We are excited and will work thru! Thank you for posting it! It looks fabulous!!!
I
Bonnie, I think once you start building you’ll see how it all comes together. Good luck and please let me know how it goes! 🙂
Thanks – I will.
I found the clarification/corrections in the comment section for the poplar boards.
I bought the two – 1/2″ x 2″ x 4′ for dowel frame, but cannot figure out for the life of me how to squeeze 37″,37″, 24 3/4″ and 24 3/4″ lengths totaling 123″ on two 4′ boards that total 96″. Perhaps qty should of reflected 3?
I’m sorry Bonnie, I don’t understand your question. Which step is causing you problems?
Referencing the outer frame first, the ones that you drilled the dowels in.
I understand the lengths of 37″, 37″ 24 3/4″ and 24 3/4″. This frame overall will be 41″ x 24 2/4″.
The above measurements equal 123 1/2 linear (in length) inches.
The supply list calls for two – 1/2″ x 4′ long – that is a total of 96″ linear inches.
Correction – Referencing the INNER frame first, the ones that you drilled the dowels in.
I understand the lengths of 37″, 37″, 24 3/4″ and 24 3/4″. This frame overall will be 41″ x 24 2/4″.
The above measurements equal 123 1/2 linear (in length) inches.
The supply list calls for two – 1/2″ x 2x 4′ long – that is a total of 96″ linear inches.
– See more at: http://inspirationformoms.com/2012/05/i-finished-it-friday-ballard-designs-inspired-beadboard-drying-rack-tutorial.html#comment-221441
This is a great idea and a great space saver. My old stand up rack bit the dust so this is a good inspiration to replace it with a better version. Would love to feature this if you could add the party to your links section. Thanks for linking this to the Craftastic Monday party at Sew Can Do!
This has been featured this week as a Craftastic Pick at Sew Can Do:)
Awesome job! That is fantastic! Sharing on Twitter. Thanks for linking it up to Monday Funday!
I want one of those things so much, now I am going to have one. Thanks for the tutorial.
I love this! Definitely pinning it for future reference!
Wow! You are so talented! Great job! I love this tutorial, I would love to have something like it some day! Thanks for linking up at OMHG WW this week!
Thanks for joining us at Project Inspire{d}!
I’m excited to be featuring your Great Idea this week at our weekend wrap up. Please be sure to grab a button or link back!
I can’t wait to see what you bring to next week’s party! 🙂
What a GREAT idea!! Our fold out drying stands didn’t survive our move two years ago and I just can’t bring myself to spend the money on new ones because they seem to be so poorly made. I *really* like this idea and am going to show it to The Mister.
Thanks for the tutorial!
Visiting from #SITSShareFest
wow this is totally awesome! love the tute, step by step so I can follow along. I have needed a rack forever so now no excuses!! Thanks for sharing with us!
I am in love with you simple to follow tutorial! Thank you for sharing it; I hope to see you this week on Thursday the 22nd at 8 pm est time- Monday 9 am est. I can’t wait to see what you bring this week!! Remember you can add up to 3 links “Anything” goes on #PureBlogLove recipes, crafts, diy projects, or informative tips and tricks you name it!!!
XoXo
H
I can’t wait to make one of these for our laundry room! Thanks for sharing at the party @DearCreatives Hope to see you again soon!! Shared…
While I love the design of this and with a first read of the instructions, it seemed very detailed. I do have to say when purchasing supplies, I found the measurements of product to buy difficult to understand as others stated above. I also found I had to improvise where the instructions lacked detail. Overall great project and mine is now hanging in my laundry room. Thank you.
Hi Janise! Thank you so much for your feed back. I would love to know where you ran into problems? It may allow me to clear up any misunderstandings in the directions and help others. Thanks!
I love this! I was wondering where the magnets go? And where did you place the wood joiners?
Thanks!